Monday, March 13, 2017

Instance Archiving and Purging in Oracle Process Cloud Service

Archiving and purging your process instances systematically can improve drastically the performance of your processes. This task has been simplified in Oracle Process Cloud Service that gives you the option to run archives on demand or automate this task via scheduled jobs.

All archived instances (data) are stored in the Oracle Cloud Storage Service that is bundled with your Oracle Process Cloud Service. Archived instances are compressed in a zip file and once an archive task is processed, you will receive an email that will contain the link to the zip file that you can click on it to download the archived instances.

Purge will remove the BPM runtime information. Purge runs as a separate job and runs directly on the database. So when you configure archiving and purging, then two separate jobs will be executed independently of each other. So let’s see how you can schedule instance archiving and purging.

Configuring instance archiving and purging is an administrative task, therefore from the Oracle Process Cloud Service home page click on the “Configure” banner to go to the application settings.

Using the left menu, click on “Archive and Purge” under the “Configure” menu item group to open the “Configure and Purge” page.
By default the “Configure Archive and Purge” page will display the “On Demand Instances Archive” tab. You can use this page to run an instance archive any time you want. You can configure various options for your archive such as whether to include audit payload data, whether to include an audit image that is basically an image that shows where in the process flow the process instance is located at the time of the archive. You can also configure whether to include task history and rules history data in your export.

You can also optionally encrypt your archive using a password by selecting the “Encrypt Archive” option to enable the “Archive Password” and “Confirm Password” input fields.

By default Oracle Process Cloud Service will send an email with a link to the zip archive to the email defined in your “My Services” profile. You have the option to ad-hoc override the default email by selecting the “Use Alternate Email” check box to define an alternative email address.

You can delete your instances after they have been archived by selecting the “Delete Instances After Export” check box. If you are archiving completed instances, then you have the option to keep instances after a specific time frame.

Once you have defined all the configurations for your on demand archive, click on “Archive”.

An information message will appear, confirmation the export request with its export id.

Once the archive request gets completed, Oracle Process Cloud Service will send an email to either the default email specified in the “My Profile” section or to the alternate email provided in the archive configuration screen that will contain a link to the exported zip archive.

Alternatively, you can use table below the “Archive Requests” section to check on the status of your export. Make sure you click on refresh to see the latest status of your export.

Please note that the state of an archive request is a link to the archived zip file, so if you click on it you will be able to download the zip file that will contain your archived instances.

You can also schedule instance archiving and purging by clicking on the “Schedule Instances Archive” tab.

By default, the scheduler is disabled and you need to enable it by checking the “Enable Archive and Purge” check box. Doing so will also enable the time fields.

You can use the time fields to define a time for your archive. In my example, I configured my archive to run every week on Friday at 23:00. Please note that time is Mountain Standard Time.

Alternatively you can use a cron expression to define an advanced scheduling interval. Please note that if you define a cron expression, the time filters will be disabled.

Use the “Archive Job Timeout” field to define the maximum time, in minutes, an archived job is allowed to run. If an archive job takes longer than the configured job timeout, the job will be stopped and the archive will pick it up from where it was left off in the next scheduled archive run.

You can receive an email notification in case of an archive failure. To do so you need to specify an email in the “Failure Notification Address” field.

If you want to also enable purging of instances, click on the “Purge Archived Data” checkbox. You can optionally define a “Purge Retention” in days, which is basically the number of days data should be retained after they have been purged.

You can also configure purge timeout period in minutes using the “Purge Job Timeout” field. In my example I’ve configured a purge retention policy of 5 days and a timeout period of 5 minutes.

Once you finish with your configurations, click on the “Save” button. You should see in the “Archive Requests” section your pending archive and purge request which is waiting for the specified time period to start.


Tuesday, January 31, 2017

Actionable Email Templates in Oracle Process Cloud Service

Oracle Process Cloud Service provides you with a very convenient and easy way to configure notifications for your human tasks though the use of email notification templates.

These notification templates are defined using HTML and can include a variety of information such as payload data, task data, you can include links to perform an action on a task directly within the email and task comments. Furthermore a notification template can be re-used across your application processes.

So let's see in practice how you can create and use an email notification template.

Create a new application in Oracle Process Cloud Service, give it a name and file it under a space (I've named it "Email Templates Demo Application" under a custom space called "aantoniou").

Create also a sample process. For demo purposes I've created a process using the "Form" pattern and named it "DemoProcess".

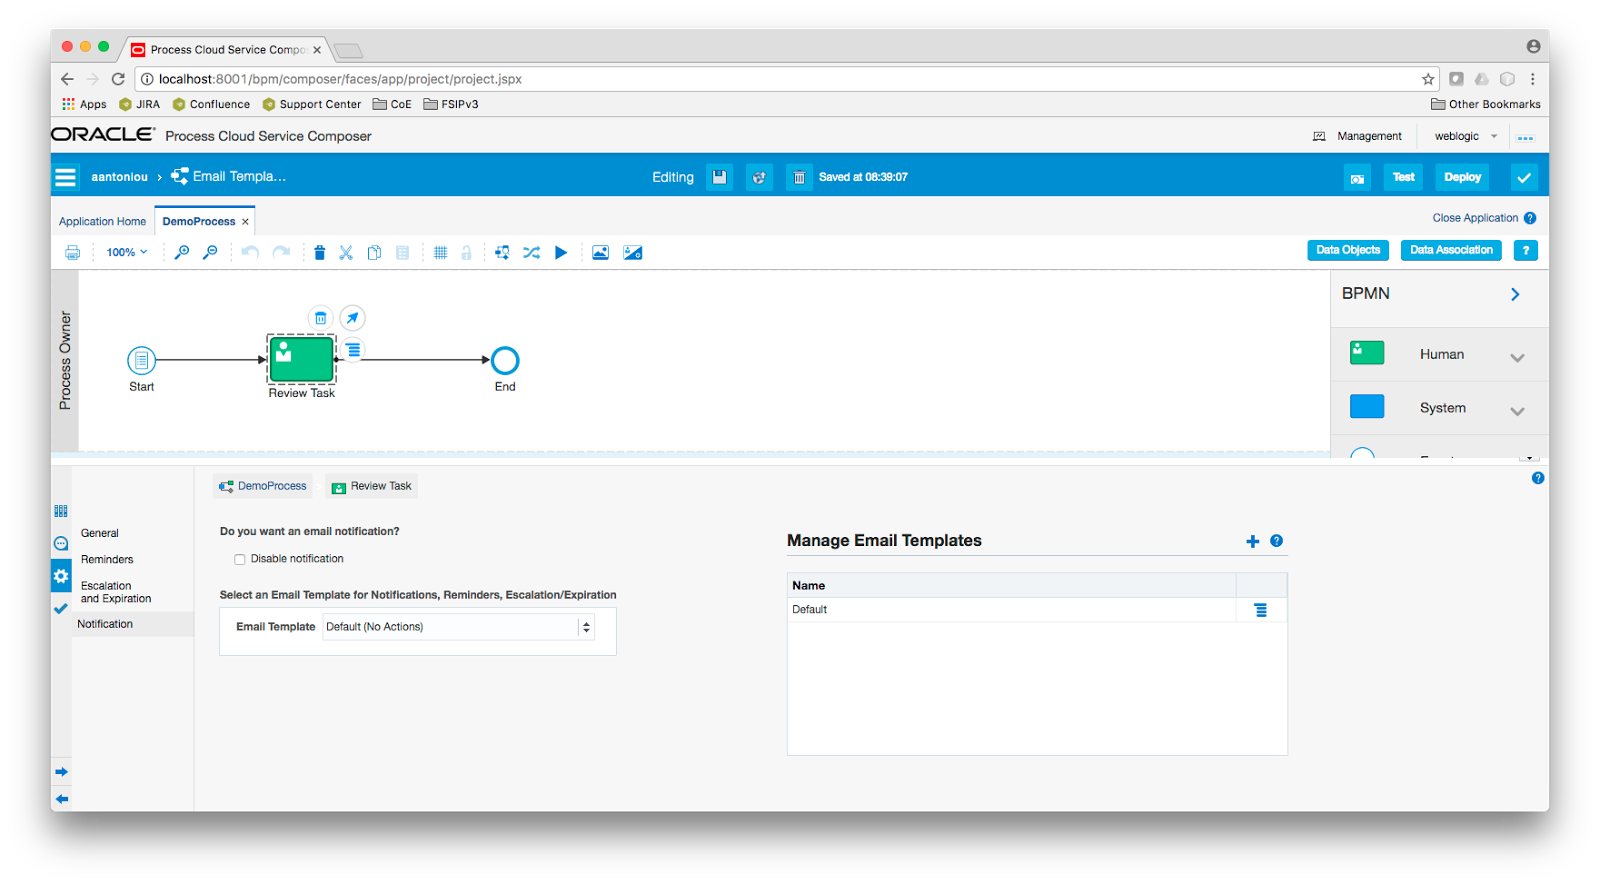
From the component palette on the right, expand the "Human" component group and drop a submit activity between the "Start" and "End" components (I've also renamed the default submit activity to "Review Task").

Open the Human Task properties, click on "Notification" and you will see the various notifications options. You can disable notifications, select which template to use for your human task or create a new notification template.

There are currently new default templates, one with actions (that is to perform an action on a task without having to go to the Workspace application) and one with no actions that contains a link to the Workspace application.

If you click on the options of the default notification template you should see that you can preview the template, copy it or download it.

Let's create a new email template from scratch. Click on the plus button to open the "Create an Email Template" window and give your email template a name.

You can upload an existing email template or you can use the code editor to define your email template by entering HTML code.

You can include data in your email template by using "mustache templates".

You can include task related data such as the title of the task, the creator, priority, outcome, etc. For a complete list of data attributes please visit the Oracle Process Cloud  Service developer guide, chapter 7 "Creating Human Tasks", section 7-16.

Click finish to create your email template. It should now feature under the email templates section. If you click on your email template options, you should see that you have more options (in addition to preview, copy and download, you have edit and delete).

To use your newly created email template, make sure you select it from the "Email Template" selection list. You are all set now.

One last note on email templates is that all email templates can be re-used within an application across processes and human tasks. So with a bit of thinking and good design, you can define email templates that can be generic for re-use.

Thursday, December 29, 2016

Templating in Oracle Process Cloud Service

Oracle Process Cloud Service released a new capability in the space of re-usability and templating called "QuickStart Master", a way to streamline application and process development by promoting your own applications as templates.

This feature is build on top of the existing QuickStart Apps capability, a very nice feature which part part of the very first release of Oracle PCS.

So let's see how you can create a very simple application in Oracle Process Cloud Service and how you can promote it as a QuickStart app.

Create a new application in Oracle Process Cloud Service, give it a name and file it under a space (I've named it "Travel Request Application" under a custom space called "aantoniou").
Create also a sample process. For simplicity purposes I've created a process using the "Form" pattern and named it "TravelRequestProcess".

Open the "Start" properties, define a title and create a new "Web Form".

Save your work and close the process. We are now ready to convert our application to a QuickStart Master.

To do so, from the "Application Home" click on the elipse button (denoted by the three dots) and choose "Convert to QuickStart Master".

On the confirmation dialog select "Yes". You can define some generic properties for your QuickStart app as well as some personalization criteria.

Expand the "Properties" section and choose an image to be used for your QuickStart App.

Colapse the "Properties" section and expand "Personalize". You can add multiple customization layers to control what settings users can customize. Click on the plus button to create a new customization.

Define a label and a title for the item that you want to provide customization capabilities. From the "Process" drop down select your process and select the type of component and the specific item that you want to provide a customization (I've selected the "Activity" type and the "Start" item).

Depending on the component type and the actual item selected, you have various properties which can be flagged for customization. In my case where I've selected the "Start" activity component, the only properties available for customization is the title (if you switch component type and item, for example lane and choose one of your lanes, you should see the "Role" property available for customization).

You also have the ability to give the capability to the users of this QuickStart app to disable the item under customization. I've left the default option to "No".

Click on "Done" and save your work. We are now ready to promote our QuickStart Master as a QuickStart application. To do so click on the "Promote" button. On the "Request to Promote as QuickStart App" properties window define a name and click "Promote"

You should get a confirmation message that your application was promoted as a QuickStart app.

Let's create a new application using our application we just promoted as a QuickStart app. From the "Composer Home" click on "Create" and select "QuickStart App". From the list of QuickStart apps select our promoted application template to create a new application.

Tuesday, December 13, 2016

Oracle Integration Cloud Service Integration in Oracle Process Cloud Service

A new integration connector has been introduced with the latest release of Oracle Process Cloud Service that enables Oracle Process Cloud Service applications to communicate directly with Oracle Integration Cloud Service.

This is a very important "architectural" feature since it encourages a solution topology that includes a virtualization layer, an integral "ingredient" in integrations to avoid point-to-point connections through decoupling and abstraction.

So let's see how you can use the "ICS Connector" to connect to ICS and consume a SOAP endpoint.

The use case that I will use in this blog post is quite simple; I will call a "Hello World" ICS Service from an Oracle Process Cloud Service process utilizing the "ICS Connector".

I've already created "Hello World" synchronous SOA composite. The implementation is very simple. I'm just using an assign component with the "concat" function to assign a static text ("Hello ") and the input to the output element of my "Hello World" service.


My "Hello World" SOA service is deployed to Oracle SOA Cloud Service (SOA CS).

Moreover I've already virtualized the above service on Oracle Integration Cloud Service (ICS) by first creating a SOAP connection to my SOA CS service and then creating a basic map data integration that uses the SOAP connection as a trigger and an invoker, creating a basic data mapper for both request and response messages.

So with the SOA service deployed on SOA CS and the virtualized service created on ICS, we are ready to create our PCS application.

Create a new application in Oracle Process Cloud Service, give it a name and file it under a space (I've named it "OracleICSIntegrationInPCSDemoApp" under my personal space).

Before creating our process, we need to create the actual integration to ICS. To do that navigate to "Integrations" and surprisingly enough you will notice that there are only two types of connectors, a "SOAP Connector" and a "REST Connector".

This is because you need to configure an "Integration Cloud Service" connection in Oracle PCS. Therefore from the Oracle PCS Home page, click on "Configure" and from the "Services" menu ensure that the "Platform" tab is selected and configure ICS by entering the URL and credentials to connect to your Oracle ICS instance. Ensure you test your connection before saving the configurations.

Go back to your application (via the "Develop Process" banner) and navigate to the "Integrations" section. You should now see the "ICS Integration" option available.

Click on the "Use ICS Integration" button and you should see a list of all your active ICS integrations. Locate and select your integration and click on "Next".

In the "Advanced" step you can configure the security for your calling service as well as some basic parameters such as the read timeout and the connection timeout.

My ICS Integration is using a username token so I've selected "APP Id - Username Token" from the "Security" drop down list.

Oracle PCS allows you to define keystores for storing your username and passwords. If you already created a keystore for your ICS service, select it from the list, otherwise select "[New Key]", give your keystore a name and supply the username and password that you use to connect to ICS and click "Create".

In your "Integrations" space you should have now your ICS integration. Please note that all metadata are inherited from ICS (for example, name, description, code and version).

To test my ICS integration I will create a simple process that starts with a form for the user to enter the service's request parameter, call the ICS service and again using the same web form to display the response from the service call.

So create a new process using the "Form" pattern.

Open the properties of the start component and define a title for your process and create a new web form.

On your web form, drag two input text components. Name the first name "Name" and the second one to "ServiceResponse". You can optionally disable the second text component since we will just use it as a placeholder for copying the service response.

Go back to your process and drag a Service component (from the System folder) between your start and end components. Rename it to "Invoke ICS Service" and go to its properties.

From the Implementation Type drop down select "Service Call" and click on the "Edit" button. This will popup the "Configure" window. Ensure that "ICS" is selected and click on the browse button to select your ICS connection.

Next we need to define the data that will be passed on to the service and the retrieve the data that will be returned back. To do that we will use the data association functionality. So From the service call component click on "Open Data Association".

Ensure that "Input" is selected and expand "Process Data", your web form's data object and drag the "name"element to the left pane of the data association editor. This should be mapped to your service's request element (in my case it's called "input").

Select "Output" and assign your service's response element (in my it's called "result") to your web form's "serviceResponse" element. The "Output" transformation should look like below.

Drag a submit human task just after your service call. Open it's properties and select the same form you've create and used in your start component.

We are now ready to test our process. Click on the play button just above your process to run an in-place execution of your process. On the start button click on the play button to open the "Play" window. Click on play to open your web form. Enter a value in your "name" field and "Submit" the form.

Please notice how PCS highlights the execution path of your instance process. You should see the token passing from the ICS Service call task and waiting at the human task component.

Click on the play button on the human task component and select "Launch Form" to open your web form. You should now see in your placeholder element the response from the service call.